在树莓派上使用 VPN 的 Linux 路由器
原理
本指南演示了如何设置带有 VPN 隧道的 Linux 路由器。您将需要第二个以太网适配器。如果您正在使用 Raspberry Pi,那么您可以使用类似 Apple USB 以太网适配器 这样的设备,因为它包含 ASIX AX88772,后者具有良好的 Linux 支持。
您也可以选择购买 实时时钟[死链接]。如果您没有 RTC,则当您的 Pi 关闭时,时间会丢失。当它重新启动时,时间将设置回 1970 年 1 月 1 日星期四。由于这比您的 VPN 证书的创建时间早,OpenVPN 将拒绝启动,这可能意味着您无法通过 VPN 进行 DNS 查找。
对于无线网络,购买了单独的接入点 (Ubiquiti UniFi AP),因为它包含 Atheros AR9287,后者受 ath9k 支持。
我选择 Raspberry Pi 是因为它价格便宜。我并不关心获得高 PPS (每秒数据包数)。您可以选择使用旧的 x86/amd64 系统来代替。如果我的互联网更好,我可能会选择 Soekris 🔓 的产品,例如 net6501 🔓,因为它比通用的 x86_64 桌面处理器具有更低的功耗。
如果您想路由速度高于 100 Mbit/s,您将需要使用硬件加密,例如 AES-NI。Soekris 产品可以选择额外的硬件加密模块 (vpn1411[死链接])。另一个选择是使用 Mini ITX 主板,以及托管交换机。我选择了 Ubiquiti ES-16-150W。
如果您希望使用 IPv6,您应该考虑查看 在树莓派上使用 VPN 的 Linux 路由器 (IPv6),因为其实现方式与本教程略有不同。
本教程中的网络看起来像这样

安装
本指南假定您正在 ramdisk 模式下从 micro SD 卡使用 Alpine Linux。它假定您已经阅读了有关如何使用 Alpine 本地备份 的基础知识。Raspberry Pi 文章包含有关如何在 Raspberry Pi 上安装 Alpine Linux 的信息。
全桥接模式的调制解调器
此特定页面使用了一个示例,其中您的调制解调器使用 PPPoE。您需要修改不适用于您的部分。
在本例中,我有一个已配置为全桥接模式的调制解调器。PPP 会话在路由器上发起。
我正在使用的调制解调器是 Cisco 877 集成服务路由器。它没有 Web 界面,而是通过 SSH 进行控制。更多信息可以在 配置 Cisco 877 为全桥接模式 中找到。
网络
/etc/hostname
将其设置为您的主机名,例如
<HOST_NAME>
/etc/hosts
设置您的主机和主机名
127.0.0.1	<HOST_NAME> <HOST_NAME>.<DOMAIN_NAME>

::1		<HOST_NAME> ipv6-gateway ipv6-loopback
ff00::0		ipv6-localnet
ff00::0		ipv6-mcastprefix
ff02::1		ipv6-allnodes
ff02::2		ipv6-allrouters
ff02::3		ipv6-allhosts
/etc/network/interfaces
配置您的网络接口。将“yourISP”更改为 /etc/ppp/peers/yourISP 中文件的文件名
#
# Network Interfaces
#

# Loopback interfaces
auto lo
iface lo inet loopback
  address 127.0.0.1
  netmask 255.0.0.0

# Internal Interface - facing LAN
auto eth0
iface eth0 inet static
  address 192.168.1.1
  netmask 255.255.255.0
  broadcast 192.168.1.255
PPP
接下来,您需要配置路由器,使其能够与调制解调器拨号 PPP 连接。
如果您的 ISP 使用 PPP,您可能需要对其进行配置。请参阅 PPP。
您需要确保设置 WAN 接口,在本例中我们使用了 eth1。
# External Interface - facing Modem
allow-hotplug eth1
auto eth1
iface eth1 inet static
  address 192.168.0.2
  netmask 255.255.255.252
  broadcast 192.168.0.3
  pre-up /sbin/ip link set eth1 up
  up ifup ppp0=yourISP
  down ifdown ppp0=yourISP
  post-down /sbin/ip link set eth1 up

# Link to ISP
iface yourISP inet ppp
  provider yourISP
IPoE
或者,ISP 使用 IPoE 也非常常见。IPoE 更简单,仅在外部接口上运行 DHCP。它应该看起来像这样
# External interface to ISP
allow-hotplug eth1
auto eth1
iface eth1 inet dhcp

iface eth1 inet static
    address 192.168.0.2
    netmask 255.255.255.252
    broadcast 192.168.0.3

iface eth1 inet6 manual
来自 ISP 的 DHCP
上面我们设置了 DHCP 并设置了静态 IP。这样做是为了我们仍然可以将数据包转发到调制解调器,以便能够访问 Web 界面或 SSH。
我们仍然需要 DHCP 才能从 ISP 获取 IP 地址。我喜欢使用 dhcpcd 而不是 udhcp(Alpine Linux 中的默认设置),因为它允许 前缀委派,这在 IPv6 网络中使用。
我的 /etc/dhcpcd.conf 看起来像这样
# Enable extra debugging
# debug
# logfile /var/log/dhcpcd.log

# Allow users of this group to interact with dhcpcd via the control
# socket.
#controlgroup wheel

# Inform the DHCP server of the hostname for DDNS.
hostname gateway

# Use the hardware address of the interface for the Client ID.
# clientid
# or
# Use the same DUID + IAID as set in DHCPv6 for DHCPv4 ClientID as
# per RFC4361. Some non-RFC compliant DHCP servers do not reply with
# this set. In this case, comment out duid and enable clientid above.
duid

# Persist interface configuration when dhcpcd exits.
persistent

# Rapid commit support.
# Safe to enable by default because it requires the equivalent option
# set on the server to actually work.
option rapid_commit

# A list of options to request from the DHCP server.
option domain_name_servers, domain_name, domain_search, host_name
option classless_static_routes

# Most distributions have NTP support.
option ntp_servers

# Respect the network MTU.
# Some interface drivers reset when changing the MTU so disabled by
# default.
#option interface_mtu 1586

# A ServerID is required by RFC2131.
require dhcp_server_identifier

# Generate Stable Private IPv6 Addresses instead of hardware based
# ones
slaac private

# A hook script is provided to lookup the hostname if not set by the
# DHCP server, but it should not be run by default.
nohook lookup-hostname

# Disable solicitations on all interfaces
noipv6rs

# Wait for IP before forking to background
waitip 6

# Don't touch DNS
nohook resolv.conf

allowinterfaces eth1 eth0.2
# Use the interface connected to WAN
interface eth1
    waitip 4
    noipv4ll
    ipv6rs # enable routing solicitation get the default IPv6 route
    iaid 1
    ia_pd 1/::/56 eth0.2/2/64
    timeout 30

interface eth0.2
    ipv6only
带有路由的基本 IPtables 防火墙
这演示了如何设置具有宽松出站防火墙的基本路由。传入数据包被阻止。其余部分在规则集中注释。
首先安装 iptables
apk add iptables
#########################################################################
# Basic iptables IPv4 routing rule set
#
# 192.168.1.0/24 routed directly to PPP0 via NAT
#
#########################################################################

#
# Mangle Table
# We leave this empty for the moment.
#
*mangle
:PREROUTING ACCEPT [0:0]
:INPUT ACCEPT [0:0]
:FORWARD ACCEPT [0:0]
:OUTPUT ACCEPT [0:0]
:POSTROUTING ACCEPT [0:0]
COMMIT

#
# Filter Table
# This is where we decide to ACCEPT, DROP or REJECT packets
#
*filter
:INPUT DROP [0:0]
:FORWARD DROP [0:0]
:OUTPUT ACCEPT [0:0]
*filter

# Create rule chain per input interface for forwarding packets
:FWD_ETH0 - [0:0]
:FWD_ETH1 - [0:0]
:FWD_PPP0 - [0:0]

# Create rule chain per input interface for input packets (for host itself)
:IN_ETH0 - [0:0]
:IN_ETH1 - [0:0]
:IN_PPP0 - [0:0]

# Create a log drop chain
:LOG_DROP - [0:0]

# Pass input packet to corresponding rule chain
-A INPUT -i lo -j ACCEPT
-A INPUT -i eth0 -j IN_ETH0
-A INPUT -i eth1 -j IN_ETH1
-A INPUT -i ppp0 -j IN_PPP0

# Pass forwarded packet to corresponding rule chain
-A FORWARD -i eth0 -j FWD_ETH0
-A FORWARD -i eth1 -j FWD_ETH1
-A FORWARD -i ppp0 -j FWD_PPP0

# Forward LAN traffic out
-A FWD_ETH0 -s 192.168.1.0/24 -m conntrack --ctstate NEW,ESTABLISHED -j ACCEPT

# Forward SSH packets from network to modem
-A FWD_ETH1 -s 192.168.0.0/30 -d 192.168.1.0/24 -p tcp -m tcp --sport 22 -m conntrack --ctstate NEW,ESTABLISHED -j ACCEPT

# Forward HTTP to modem's webserver
-A FWD_ETH1 -s 192.168.0.0/30 -d 192.168.1.0/24 -p tcp -m tcp --sport 80 -m conntrack --ctstate NEW,ESTABLISHED -j ACCEPT

# Forward traffic to ISP
-A FWD_PPP0 -m conntrack --ctstate RELATED,ESTABLISHED -j ACCEPT

# SSH to Router
-A IN_ETH0 -s 192.168.1.0/24 -p tcp -m tcp --dport 22 -m conntrack --ctstate NEW,ESTABLISHED -j ACCEPT

# DNS to Router
-A IN_ETH0 -s 192.168.1.0/24 -p tcp -m tcp --dport 1812 -m conntrack --ctstate NEW,ESTABLISHED -j ACCEPT

# FreeRadius Client (eg a UniFi AP)
-A IN_ETH0 -s 192.168.1.0/24 -p udp -m udp --dport 1812 -m conntrack --ctstate NEW,ESTABLISHED -j ACCEPT

# NTP to Router
-A IN_ETH0 -s 192.168.1.0/24 -p udp -m udp --dport 123 -m conntrack --ctstate NEW,ESTABLISHED -j ACCEPT

# Accept traffic
-A IN_ETH0 -s 192.168.1.0/24 -m conntrack --ctstate NEW,ESTABLISHED -j ACCEPT

# SSH To Modem from Router
-A IN_ETH1 -s 192.168.0.1/32 -d 192.168.0.0/30 -p tcp -m tcp --sport 22 -m conntrack --ctstate NEW,ESTABLISHED -j ACCEPT

# HTTP to modem
-A IN_ETH1 -s 192.168.0.1/32 -d 192.168.0.0/30 -p tcp -m tcp --sport 80 -m conntrack --ctstate NEW,ESTABLISHED -j ACCEPT

# Accept incoming tracked PPP0 connection
-A IN_PPP0 -m conntrack --ctstate RELATED,ESTABLISHED -j ACCEPT
COMMIT

#
# NAT Table
# This is where translation of packets happens as well as "forwarding" of ports
# to specific hosts.
#
*nat
:PREROUTING ACCEPT [0:0]
:INPUT ACCEPT [0:0]
:OUTPUT ACCEPT [0:0]
:POSTROUTING ACCEPT [0:0]

# Port forwarding for Bittorrent
-A PREROUTING -i ppp0 -p tcp -m tcp --dport 6881:6889 -j DNAT --to-destination 192.168.1.20
-A PREROUTING -i ppp0 -p udp -m udp --dport 6881:6889 -j DNAT --to-destination 192.168.1.20

# Allows routing to our modem subnet so we can access the web interface or SSH
-A POSTROUTING -s 192.168.1.0/24 -d 192.168.0.1/32 -o eth1 -p tcp -m tcp --dport 22 -j MASQUERADE
-A POSTROUTING -s 192.168.1.0/24 -d 192.168.0.1/32 -o eth1 -p tcp -m tcp --dport 80 -j MASQUERADE

# Allows hosts of the network to use the PPP tunnel
-A POSTROUTING -s 192.168.1.0/24 -o ppp0 -j MASQUERADE
COMMIT
如果您是 iptables 新手,我还强烈建议阅读这些资源
/etc/sysctl.d/local.conf
# Controls IP packet forwarding
net.ipv4.ip_forward = 1

# Needed to use fwmark, only required if you want to set up the VPN subnet later in this article
net.ipv4.conf.all.rp_filter = 2

# Disable IPv6
net.ipv6.conf.all.disable_ipv6 = 1
net.ipv6.conf.lo.disable_ipv6 = 1
net.ipv6.conf.default.disable_ipv6 = 1
请注意,此处禁用了 IPv6,如果您想要使用 IPv6,请参阅另一个教程 在树莓派上使用 VPN 的 Linux 路由器 (IPv6)。您可能还希望查看 ip-sysctl.txt 以阅读有关其他键的信息。
DHCP
apk add dhcp
/etc/conf.d/dhcpd
指定配置文件位置、要运行的接口以及您希望 DHCPD 在 IPv4 模式下运行。
# /etc/conf.d/dhcpd: config file for /etc/init.d/dhcpd

# If you require more than one instance of dhcpd, you can create symbolic
# links to dhcpd service like so
#   cd /etc/init.d
#   ln -s dhcpd dhcpd.foo
#   cd ../conf.d
#   cp dhcpd dhcpd.foo
# Now you can edit dhcpd.foo and specify a different configuration file.
# You'll also need to specify a pidfile in the dhcpd.conf file.
# See the pid-file-name option in the dhcpd.conf man page for details.

# If you wish to run dhcpd in a chroot environment, uncomment the following line
# DHCPD_CHROOT="/var/lib/dhcp/chroot"

# All file paths below are relative to the chroot.
# You can specify a different chroot directory, but MAKE SURE it's empty.

# Specify a configuration file - the default is /etc/dhcp/dhcpd.conf
DHCPD_CONF="/etc/dhcp/dhcpd.conf"

# Configure which interface or interfaces to for dhcpd to listen on.
# List all interfaces space separated. If this is not specified then
# we listen on all interfaces.
DHCPD_IFACE="eth0"

# Insert any other dhcpd options. See the man page for a full list.
DHCPD_OPTS="-4"
/etc/dhcp/dhcpd.conf
配置您的 DHCP 配置服务器。对于我的 DHCP 服务器,我将有三个子网。每个子网都有特定的用途。您可以选择拥有任意数量的子网,如下所示。如果您使用了 VLAN,则 broadcast-address 将有所不同。但是,在本例中未使用 VLAN。
authoritative;
ddns-update-style interim;

shared-network home {
  subnet 192.168.1.0 netmask 255.255.255.0 {
    range 192.168.1.10 192.168.1.240;
    option subnet-mask 255.255.255.0;
    option broadcast-address 192.168.1.255;
    option routers 192.168.1.1;
    option ntp-servers 192.168.1.1;
    option domain-name-servers 192.168.1.1;
    allow unknown-clients;
  }

  subnet 192.168.2.0 netmask 255.255.255.0 {
    range 192.168.2.10 192.168.2.240;
    option subnet-mask 255.255.255.0;
    option broadcast-address 192.168.2.255;
    option routers 192.168.2.1;
    option ntp-servers 192.168.2.1;
    option domain-name-servers 192.168.1.1;
    ignore unknown-clients;
  }

  subnet 192.168.3.0 netmask 255.255.255.0 {
    range 192.168.3.10 192.168.3.240;
    option subnet-mask 255.255.255.0;
    option broadcast-address 192.168.3.255;
    option routers 192.168.3.1;
    option ntp-servers 192.168.3.1;
    option domain-name-servers 192.168.1.1;
    ignore unknown-clients;
  }
}

host Gaming_Computer {
  hardware ethernet 00:53:00:FF:FF:11;
  fixed-address 192.168.1.20;
  option subnet-mask 255.255.255.0;
  option broadcast-address 192.168.1.255;
  option routers 192.168.1.1;
  option host-name "gaming_computer";
}

host Linux_Workstation {
  hardware ethernet 00:53:00:FF:FF:22;
  fixed-address 192.168.2.21;
  option subnet-mask 255.255.255.0;
  option broadcast-address 192.168.2.255;
  option routers 192.168.2.1;
  option host-name "linux_workstation";
}

host printer {
  hardware ethernet 00:53:00:FF:FF:33;
  fixed-address 192.168.3.9;
  option subnet-mask 255.255.255.0;
  option broadcast-address 192.168.3.255;
  option routers 192.168.3.1;
}
配置完成后,请务必将其添加到默认运行级别
rc-update add dhcpd default
同步时钟
您可以选择使用 BusyBox 的 ntpd,也可以选择更成熟的选项,如 OpenNTPD 或 Chrony
Busybox /etc/conf.d/ntpd
允许客户端将其时钟与路由器同步。
# By default ntpd runs as a client. Add -l to run as a server on port 123.
NTPD_OPTS="-l -N -p <REMOTE TIME SERVER>"
配置完成后,请务必将其添加到默认运行级别
rc-update add ntpd default
或者,如果您愿意,可以与多个服务器同步...
Chrony /etc/chrony.conf
apk add chrony
logdir /var/log/chrony
log measurements statistics tracking

allow 192.168.0.0/30
allow 192.168.1.0/24
allow 192.168.2.0/24
allow 192.168.3.0/24
allow 192.168.4.0/24
broadcast 30 192.168.0.3
broadcast 30 192.168.1.255
broadcast 30 192.168.2.255
broadcast 30 192.168.3.255
broadcast 30 192.168.4.255

server 0.pool.ntp.org iburst
server 1.pool.ntp.org iburst
server 2.pool.ntp.org iburst
server 3.pool.ntp.org iburst

initstepslew 10 pool.ntp.org
driftfile /var/lib/chrony/chrony.drift
hwclockfile /etc/adjtime
rtcdevice /dev/rtc0
rtcsync
OpenNTPD /etc/ntpd.conf
安装 OpenNTPD
apk add openntpd
添加到默认运行级别。
rc-update add openntpd default
/etc/ntpd.conf
# sample ntpd configuration file, see ntpd.conf(5)

# Addresses to listen on (ntpd does not listen by default)
listen on 192.168.1.1
listen on 192.168.2.1

# sync to a single server
#server pool.ntp.org

# use a random selection of NTP Pool Time Servers
# see https://support.ntp.org/Servers/NTPPoolServers
server 0.pool.ntp.org
server 1.pool.ntp.org
server 2.pool.ntp.org
server 3.pool.ntp.org
时区
您可能还想设置时区,请参阅 设置时区。
保存时间
有两种方法可以做到这一点。如果您没有购买 RTC,请参阅 使用软件时钟保存时间。如果您购买了,例如 PiFace 实时时钟,请参阅 使用硬件时钟保存时间
带有 dnscrypt 的 Unbound DNS 转发器
我们希望能够使用 dnscrypt 进行查找,而无需在网络上的每个客户端上安装 DNSCrypt。DNSCrypt 可以使用其 自有协议 或 DNS over HTTPS。
路由器还将运行 DNS 转发器,并为我们的客户端通过 DNSCrypt 请求未知域名。借用自 ArchLinux wiki 上关于 dnscrypt-proxy 的文章。
Unbound
首先安装
apk add unbound
/etc/unbound/unbound.conf
server:
    # Use this to include other text into the file.
    include: "/etc/unbound/filter.conf"

    # verbosity number, 0 is least verbose. 1 is default.
    verbosity: 1

    # specify the interfaces to answer queries from by ip-address.
    # The default is to listen to localhost (127.0.0.1 and ::1).
    # specify 0.0.0.0 and ::0 to bind to all available interfaces.
    # specify every interface[@port] on a new 'interface:' labelled line.
    # The listen interfaces are not changed on reload, only on restart.
    interface: 192.168.2.1
    interface: 192.168.3.1

    # Enable IPv4, "yes" or "no".
    do-ip4: yes

    # Enable IPv6, "yes" or "no".
    do-ip6: yes

    # Enable UDP, "yes" or "no".
    do-udp: yes

    # Enable TCP, "yes" or "no".
    do-tcp: yes

    # control which clients are allowed to make (recursive) queries
    # to this server. Specify classless netblocks with /size and action.
    # By default everything is refused, except for localhost.
    # Choose deny (drop message), refuse (polite error reply),
    # allow (recursive ok), allow_setrd (recursive ok, rd bit is forced on),
    # allow_snoop (recursive and nonrecursive ok)
    # deny_non_local (drop queries unless can be answered from local-data)
    # refuse_non_local (like deny_non_local but polite error reply).
    # access-control: 0.0.0.0/0 refuse
    # access-control: 127.0.0.0/8 allow
    # access-control: ::0/0 refuse
    # access-control: ::1 allow
    # access-control: ::ffff:127.0.0.1 allow
    access-control: 192.168.1.0/24 allow
    access-control: 192.168.2.0/24 allow
    access-control: 192.168.3.0/24 allow

    # the log file, "" means log to stderr.
    # Use of this option sets use-syslog to "no".
    logfile: "/var/log/unbound/unbound.log"

    # Log to syslog(3) if yes. The log facility LOG_DAEMON is used to
    # log to. If yes, it overrides the logfile.
    use-syslog: no

    # print one line with time, IP, name, type, class for every query.
    # log-queries: no

    # print one line per reply, with time, IP, name, type, class, rcode,
    # timetoresolve, fromcache and responsesize.
    # log-replies: no

    # enable to not answer id.server and hostname.bind queries.
    hide-identity: yes

    # enable to not answer version.server and version.bind queries.
    # hide-version: yes

    # enable to not answer trustanchor.unbound queries.
    hide-trustanchor: yes


    # Harden against very small EDNS buffer sizes.
    harden-short-bufsize: yes

    # Harden against unseemly large queries.
    harden-large-queries: yes

    # Harden against out of zone rrsets, to avoid spoofing attempts.
    harden-glue: yes

    # Harden against receiving dnssec-stripped data. If you turn it
    # off, failing to validate dnskey data for a trustanchor will
    # trigger insecure mode for that zone (like without a trustanchor).
    # Default on, which insists on dnssec data for trust-anchored zones.
    harden-dnssec-stripped: yes

    # Harden against queries that fall under dnssec-signed nxdomain names.
    harden-below-nxdomain: yes

    # Harden the referral path by performing additional queries for
    # infrastructure data.  Validates the replies (if possible).
    # Default off, because the lookups burden the server.  Experimental
    # implementation of draft-wijngaards-dnsext-resolver-side-mitigation.
    # harden-referral-path: no

    # Harden against algorithm downgrade when multiple algorithms are
    # advertised in the DS record.  If no, allows the weakest algorithm
    # to validate the zone.
    harden-algo-downgrade: yes

    # Use 0x20-encoded random bits in the query to foil spoof attempts.
    # This feature is an experimental implementation of draft dns-0x20.
    use-caps-for-id: yes

    # Allow the domain (and its subdomains) to contain private addresses.
    # local-data statements are allowed to contain private addresses too.
    private-domain: "<HOSTNAME>"

    # if yes, the above default do-not-query-address entries are present.
    # if no, localhost can be queried (for testing and debugging).
    do-not-query-localhost: no

    # File with trusted keys, kept uptodate using RFC5011 probes,
    # initial file like trust-anchor-file, then it stores metadata.
    # Use several entries, one per domain name, to track multiple zones.
    #
    # If you want to perform DNSSEC validation, run unbound-anchor before
    # you start unbound (i.e. in the system boot scripts).  And enable:
    # Please note usage of unbound-anchor root anchor is at your own risk
    # and under the terms of our LICENSE (see that file in the source).
    # auto-trust-anchor-file: "@UNBOUND_ROOTKEY_FILE@"
    auto-trust-anchor-file: "/etc/unbound/root.key"

    # If unbound is running service for the local host, then it is useful
    # to perform lan-wide lookups to the upstream, and unblock the
    # long list of local-zones above.  If this unbound is a dns server
    # for a network of computers, disabled is better and stops information
    # leakage of local lan information.
    unblock-lan-zones: no

    # If you configure local-data without specifying local-zone, by
    # default, a transparent local-zone is created for the data.
    #
    # You can add locally served data with
    # local-zone: "local." static
    # local-data: "mycomputer.local. IN A 192.0.2.51"
    # local-data: 'mytext.local TXT "content of text record"'

    # request upstream over TLS (with plain DNS inside the TLS stream).
    # Default is no.  Can be turned on and off with unbound-control.
    # tls-upstream: no

    # Forward zones
    # Create entries like below, to make all queries for 'example.com' and
    # 'example.org' go to the given list of servers. These servers have to handle
    # recursion to other nameservers. List zero or more nameservers by hostname
    # or by ipaddress. Use an entry with name "." to forward all queries.
    # If you enable forward-first, it attempts without the forward if it fails.
    # forward-zone:
    #    name: "example.com"
    #    forward-addr: 192.0.2.68
    #    forward-addr: 192.0.2.73@5355  # forward to port 5355.
    #    forward-first: no
    #    forward-tls-upstream: no
    #    forward-no-cache: no
    # forward-zone:
    #    name: "example.org"
    #    forward-host: fwd.example.com

forward-zone:
    name: "."
    forward-addr: 172.16.32.1@53
    forward-addr: ::1@53000
    forward-addr: 127.0.0.1@53000
额外的 DNS 级别过滤
此脚本接收域名列表并生成过滤器文件。我们将所有查找定向到“0.0.0.1”,这是一个无效的 IP,应该立即失败,与 localhost 不同。
/etc/unbound/unbound.conf
在您的主 unbound 配置中,添加
include: /etc/unbound/filter.conf
用于准备/排序 Unbound 域名的脚本
#!/bin/sh

##################################################
# Script taken from
# https://web.archive.org/web/20160815143410/http://npr.me.uk/unbound.html
# Note: you need GNU sed
##################################################

# Remove "#" comments
# Remove space and tab
# Remove blank lines
# Remove localhost and broadcasthost lines
# Keep just the hosts
# Remove leading and trailing space and tab (again)
# Make everything lower case

sed -e "s/#.*//" \
    -e "s/[ \x09]*$//"\
    -e "/^$/ d" \
    -e "/^.*local.*/ d" \
    -e "/^.*broadcasthost.*/ d" \
    -e "s/\(^.*\) \([a-zA-Z0-9\.\-]*\)/\2/" \
    -e "s/^[ \x09]*//;s/[ \x09]*$//" $1 \
    -e "s/\(.*\)/\L\1/" hosts.txt > temp1.txt

# Remove any duplicate hosts

sort temp1.txt | uniq >temp2.txt

# Remove any hosts starting with "."
# Create the two required lines for each host.

sed -e "/^\..*/ d" \
    -e "s/\(^.*\)/local-zone: \x22\1\x22 redirect\nlocal-data: \x22\1 A 0.0.0.1\x22/" \
       temp2.txt > filter.conf

# Clean up
rm temp1.txt
rm temp2.txt
DNSCrypt
您可以使用 dnsleak.com 或 GRC 的这个网站来测试您是否没有 DNS 泄漏。诸如 CloudFlare 公共 DNS 和 Google 公共 DNS 之类的提供商使用 任播,它应该指向位于您的 VPN 出口位置的服务器。
/etc/dnscrypt-proxy/dnscrypt-proxy.toml
使用示例 dnscrypt 配置即可。您需要进行以下更改
listen_addresses = ['127.0.0.1:53000', '[::1]:53000']
为 VPN 上的 dnscrypt 添加策略路由
根据 dnscrypt 用户的 uid 添加 基于策略的路由。在 Alpine Linux 上,dnscrypt-proxy 以特定用户身份运行,因此请检查 /etc/passwd
dnscrypt:x:103:104:dnscrypt:/var/empty:/sbin/nologin
在本例中,dnscrypt 用户的 uid 为 103。

将其添加到 fwmark_rules,例如
/etc/network/fwmark_rules
# Route DNSCrypt user through the VPN table
/sbin/ip rule add uidrange 103-103 table VPN prio 200
rc-update add unbound default
rc-update add dnscrypt-proxy default
随机数生成
有两种方法可以协助随机数生成 熵和随机性。如果您要生成自己的 Diffie-Hellman nonce 文件(在 FreeRadius EAP-TLS 配置 部分中使用),或者任何诸如生成证书或公钥私钥之类的过程,这将特别有用。
Haveged
Haveged 是提高随机数生成速度的好方法。它使用基于 HAVEGE 算法改编的不可预测的随机数生成器。
安装 haveged
apk add haveged
启动 haveged 服务
service haveged start
将服务添加到启动项
rc-update add haveged default
启动 rngd 服务
service haveged start
将服务添加到启动项
rc-update add haveged default
带有 bcm2708-rng 的 rng-tools
Alpine Linux 3.8 之前版本(包含 rngd 5)
所有 Raspberry Pi 都板载 bcm2708-rng 随机数生成器。如果您在 Raspberry Pi 上进行此项目,那么您可以选择使用它。
将内核模块添加到 /etc/modules
echo "bcm2708-rng" > /etc/modules
插入模块
modprobe bcm2708-rng
安装 rng-tools
apk add rng-tools
在 /etc/conf.d/rngd 中设置随机设备 (/dev/random) 和 rng 设备 (/dev/hwrng)
RNGD_OPTS="--no-drng=1 --no-tpm=1 -o /dev/random -r /dev/hwrng"
Alpine Linux 3.8 之后版本(包含 rngd 6)
使用 AlpineLinux 3.8,您不必插入模块,因为它已内置在内核中。
此外,rngd 的语法已更改,因此对于 /etc/conf.d/rngd,您需要
RNGD_OPTS="-x1 -o /dev/random -r /dev/hwrng"
启动 rngd 服务
service rngd start
将服务添加到启动项
rc-update add rngd default
您可以使用以下命令进行测试
cat /dev/hwrng | rngtest -c 1000
您应该看到类似这样的内容
rngtest 5
Copyright (c) 2004 by Henrique de Moraes Holschuh
This is free software; see the source for copying conditions.  There is NO warranty; not even for MERCHANTABILITY or FITNESS FOR A PARTICULAR PURPOSE.

rngtest: starting FIPS tests...
rngtest: bits received from input: 20000032
rngtest: FIPS 140-2 successes: 1000
rngtest: FIPS 140-2 failures: 0
rngtest: FIPS 140-2(2001-10-10) Monobit: 0
rngtest: FIPS 140-2(2001-10-10) Poker: 0
rngtest: FIPS 140-2(2001-10-10) Runs: 0
rngtest: FIPS 140-2(2001-10-10) Long run: 0
rngtest: FIPS 140-2(2001-10-10) Continuous run: 0
rngtest: input channel speed: (min=117.709; avg=808.831; max=3255208.333)Kibits/s
rngtest: FIPS tests speed: (min=17.199; avg=22.207; max=22.653)Mibits/s
rngtest: Program run time: 25178079 microseconds
您可能会遇到一些故障。没关系,我之前做的两次运行每次都出现一次故障。
WiFi 802.1x EAP 和 FreeRadius
比使用预共享密钥 (WPA2) 更安全的方法是使用 EAP-TLS 并为每个设备使用单独的证书。请参阅 FreeRadius EAP-TLS 配置
特定子网上的 VPN 隧道
正如本文前面提到的,拥有 VPN 子网和非 VPN 子网可能很有用。通常,游戏机或计算机可能需要低延迟连接。对于本练习,我们使用 fwmark。
我们扩展网络以使其看起来像这样

安装必要的软件包
apk add openvpn iproute2 iputils
/etc/modules
您需要添加 tun 模块
tun
/etc/iproute2/rt_tables
将两个路由表添加到 rt_tables 的底部。它应该看起来像这样
#
# reserved values
#
255	local
254	main
253	default
0	unspec
#
# local
#
#1	inr.ruhep
1 ISP
2 VPN
/etc/network/interfaces
接下来,添加虚拟接口(实际上只是 eth0 的 IP 地址)eth0:2,在 eth0 下面即可。
# Route to VPN subnet
auto eth0:2
iface eth0:2 inet static
  address 192.168.2.1
  netmask 255.255.255.0
  broadcast 192.168.2.255
  post-up /etc/network/fwmark_rules
/etc/sysctl.d/local.conf
如果您想使用 fwmark 规则,则需要更改此设置。它会导致路由器仍然进行源验证。
# Needed to use fwmark
net.ipv4.conf.all.rp_filter = 2
如果将此项设置为 1,则 fwmark 将不起作用。
/etc/network/fwmark_rules
在此文件中,我们要放置 fwmark 规则并设置正确的优先级。
#!/bin/sh

# Normal packets to go direct out WAN
/sbin/ip rule add fwmark 1 table ISP prio 100

# Put packets destined into VPN when VPN is up
/sbin/ip rule add fwmark 2 table VPN prio 200

# Prevent packets from being routed out when VPN is down.
# This prevents packets from falling back to the main table
# that has a priority of 32766
/sbin/ip rule add prohibit fwmark 2 prio 300
/etc/ppp/ip-up
接下来,我们要创建 PPP 联机时应运行的路由。在 ip-up 和 ip-down 中,我们可以使用特殊的钩子来引用 IP 地址,ppp man 文件 - Scripts 如果您安装了 ppp-doc,您也可以在您的 man 文件中阅读有关它们的信息。
#!/bin/sh
#
# This script is run by pppd when there's a successful ppp connection.
#

# Flush out any old rules that might be there
/sbin/ip route flush table ISP

# Add route to table from subnets on LAN
/sbin/ip route add 192.168.1.0/24 dev eth0 table ISP
/sbin/ip route add 192.168.2.0/24 dev eth0 table ISP

# Add route from IP given by ISP to the table
/sbin/ip rule add from ${IPREMOTE} table ISP prio 100

# Add a default route
/sbin/ip route add table ISP default via ${IPREMOTE} dev ${IFNAME}
/etc/ppp/ip-down
#!/bin/sh
#
# This script is run by pppd after the connection has ended.
#

# Delete the rules when we take the interface down
/sbin/ip rule del from ${IPREMOTE} table ISP prio 100
/etc/openvpn/route-up-fwmark.sh
OpenVPN 需要类似的路由脚本,并且它也有自己的特殊钩子,允许您指定特定值。完整列表在此处 OpenVPN man 文件 - 环境变量
#!/bin/sh
#
# This script is run by OpenVPN when there's a successful VPN connection.
#

# Flush out any old rules that might be there
/sbin/ip route flush table VPN

# Add route to table from 192.168.2.0/24 subnet on LAN
/sbin/ip route add 192.168.2.0/24 dev eth0 table VPN

# Add route from VPN interface IP to the VPN table
/sbin/ip rule add from ${ifconfig_local} table VPN prio 200

# Add a default route
/sbin/ip route add default via ${ifconfig_local} dev ${dev} table VPN
/etc/openvpn/route-pre-down-fwmark.sh
#!/bin/sh
#
# This script is run by OpenVPN after the connection has ended
#

# Delete the rules when we take the interface down
/sbin/ip rule del from ${ifconfig_local} table VPN prio 200
我发现,当启动和停止 OpenVPN 服务时,如果您使用
service openvpn stop
route-pre-down-fwmark.sh 中的规则未执行。
然而
rc-service openvpn stop
似乎可以正常工作。
允许路由到两个路由表的高级 IPtables 规则
这是先前规则集的扩展。它为 192.168.2.0 设置 NAT 伪装,以使用标记的数据包通过 VPN。
我使用这些指南完成了此操作
#########################################################################
# Advanced routing rule set
# Uses 192.168.1.0 via ISP
#      192.168.2.0 via VPN
#
# Packets to/from 192.168.1.0/24 are marked with 0x1 and routed to ISP
# Packets to/from 192.168.2.0/24 are marked with 0x2 and routed to VPN
#
#########################################################################

#
# NAT Table
# This is where translation of packets happens and "forwarding" of ports
# to specific hosts.
#
*nat

# Set default policies for table
:PREROUTING ACCEPT [0:0]
:INPUT ACCEPT [0:0]
:OUTPUT ACCEPT [0:0]
:POSTROUTING ACCEPT [0:0]

# Port forwarding for Bittorrent
-A PREROUTING -i tun0 -p tcp -m tcp --dport 6881:6889 -j DNAT --to-destination 192.168.2.20
-A PREROUTING -i tun0 -p udp -m udp --dport 6881:6889 -j DNAT --to-destination 192.168.2.20

# Allows routing to our modem subnet so we can access the web interface
-A POSTROUTING -s 192.168.1.0/24 -d 192.168.0.1/32 -o eth1 -p tcp -m tcp --dport 80 -j MASQUERADE
-A POSTROUTING -s 192.168.2.0/24 -d 192.168.0.1/32 -o eth1 -p tcp -m tcp --dport 80 -j MASQUERADE

# Allows hosts of the network to use the VPN tunnel
-A POSTROUTING -o tun0 -j MASQUERADE

# Allows hosts of the network to use the PPP tunnel
-A POSTROUTING -o ppp0 -j MASQUERADE
COMMIT

#
# Filter Table
# This is where we decide to ACCEPT, DROP or REJECT things
#
*filter
:INPUT DROP [0:0]
:FORWARD DROP [0:0]
:OUTPUT ACCEPT [0:0]

# Create rule chain per input interface for forwarding packets
:FWD_ETH0 - [0:0]
:FWD_ETH1 - [0:0]
:FWD_PPP0 - [0:0]
:FWD_TUN0 - [0:0]

# Create rule chain per input interface for input packets (for host itself)
:IN_ETH0 - [0:0]
:IN_ETH1 - [0:0]
:IN_PPP0 - [0:0]
:IN_TUN0 - [0:0]

# Create a log drop chain
:LOG_DROP - [0:0]

# Create a reject chain
:LOG_REJECT - [0:0]

# Pass input packet to corresponding rule chain
-A INPUT -i lo -j ACCEPT
-A INPUT -i eth0 -j IN_ETH0
-A INPUT -i eth1 -j IN_ETH1
-A INPUT -i ppp0 -j IN_PPP0
-A INPUT -i tun0 -j IN_TUN0

# Track forwarded packets
-A FORWARD -m conntrack --ctstate RELATED,ESTABLISHED -j ACCEPT

# Pass forwarded packet to corresponding rule chain
-A FORWARD -i eth0 -j FWD_ETH0
-A FORWARD -i eth1 -j FWD_ETH1
-A FORWARD -i ppp0 -j FWD_PPP0
-A FORWARD -i tun0 -j FWD_TUN0

# Forward traffic to ISP
-A FWD_ETH0 -s 192.168.1.0/24 -j ACCEPT

# Forward traffic to VPN
-A FWD_ETH0 -s 192.168.2.0/24 -j ACCEPT

# Allow excepted server to be FORWARD to ppp0
#-A FWD_ETH0 -s 192.168.2.0/24 -d <IP_OF_EXCEPTED_SERVER>/32 -o ppp0 -j ACCEPT

# Forward SSH packets from network to modem
-A FWD_ETH1 -s 192.168.0.1/32 -d 192.168.1.0/24 -p tcp -m tcp --sport 22 -m conntrack --ctstate NEW,ESTABLISHED -j ACCEPT
-A FWD_ETH1 -s 192.168.0.1/32 -d 192.168.2.0/24 -p tcp -m tcp --sport 22 -m conntrack --ctstate NEW,ESTABLISHED -j ACCEPT

# Forward HTTP packets from network to modem
-A FWD_ETH1 -s 192.168.0.1/32 -d 192.168.1.0/24 -p tcp -m tcp --sport 80 -m conntrack --ctstate NEW,ESTABLISHED -j ACCEPT
-A FWD_ETH1 -s 192.168.0.1/32 -d 192.168.2.0/24 -p tcp -m tcp --sport 80 -m conntrack --ctstate NEW,ESTABLISHED -j ACCEPT

# Forward Bittorrent Port to workstation
-A FWD_TUN0 -d 192.168.2.20/32 -p tcp -m tcp --dport 6881:6889 -m conntrack --ctstate NEW,ESTABLISHED -j ACCEPT
-A FWD_TUN0 -d 192.168.2.20/32 -p udp -m udp --dport 6881:6889 -m conntrack --ctstate NEW,ESTABLISHED -j ACCEPT

# SSH to Router
-A IN_ETH0 -s 192.168.1.0/24 -p tcp -m tcp --dport 22 -m conntrack --ctstate NEW,ESTABLISHED -j ACCEPT
-A IN_ETH0 -s 192.168.2.0/24 -p tcp -m tcp --dport 22 -m conntrack --ctstate NEW,ESTABLISHED -j ACCEPT

# DNS to Router
-A IN_ETH0 -s 192.168.1.0/24 -p udp -m udp --dport 53 -m conntrack --ctstate NEW -j ACCEPT
-A IN_ETH0 -s 192.168.2.0/24 -p udp -m udp --dport 53 -m conntrack --ctstate NEW -j ACCEPT

# FreeRadius Client (eg a UniFi AP)
-A IN_ETH0 -s 192.168.1.0/24 -p tcp -m tcp --dport 1812 -m conntrack --ctstate NEW,ESTABLISHED -j ACCEPT
-A IN_ETH0 -s 192.168.1.0/24 -p udp -m udp --dport 1812 -m conntrack --ctstate NEW,ESTABLISHED -j ACCEPT

# Ubiquiti UAP Device Discovery Broadcast
-A IN_ETH0 -s 192.168.1.0/24 -p udp -m udp --dport 10001 -m conntrack --ctstate NEW,ESTABLISHED -j ACCEPT

# NTP to Router
-A IN_ETH0 -s 192.168.1.0/24 -p udp -m udp --dport 123 -m conntrack --ctstate NEW,ESTABLISHED -j ACCEPT
-A IN_ETH0 -s 192.168.2.0/24 -p udp -m udp --dport 123 -m conntrack --ctstate NEW,ESTABLISHED -j ACCEPT

# Accept traffic to router on both subnets
-A IN_ETH0 -s 192.168.1.0/24 -m conntrack --ctstate NEW,ESTABLISHED -j ACCEPT
-A IN_ETH0 -s 192.168.2.0/24 -m conntrack --ctstate NEW,ESTABLISHED -j ACCEPT

# Allow excepted server to be INPUT to eth0 from LAN
#-A IN_ETH0 -s 192.168.2.0/24 -d <IP_OF_EXCEPTED_SERVER>/32 -o ppp0 -j ACCEPT

# SSH To Modem from Router
-A IN_ETH1 -s 192.168.0.1/32 -d 192.168.0.0/30 -p tcp -m tcp --sport 22 -m conntrack --ctstate NEW,ESTABLISHED -j ACCEPT

# HTTP To Modem from Router
-A IN_ETH1 -s 192.168.0.1/32 -d 192.168.0.0/30 -p tcp -m tcp --sport 80 -m conntrack --ctstate NEW,ESTABLISHED -j ACCEPT

# Accept incoming tracked PPP0 connection
-A IN_PPP0 -m conntrack --ctstate RELATED,ESTABLISHED -j ACCEPT

# Log dropped packets coming in on PPP0
-A IN_PPP0 -j LOG --log-prefix "DROP:INPUT " --log-level 6
-A IN_PPP0 -j LOG_DROP

# Accept incoming tracked TUN0 connection
-A IN_TUN0 -m conntrack --ctstate RELATED,ESTABLISHED -j ACCEPT

# Log dropped packets coming in on TUN0
-A IN_TUN0 -j LOG --log-prefix "DROP:INPUT " --log-level 6
-A IN_TUN0 -j LOG_DROP
COMMIT

#
# Mangle Table
# This is the place where our markings happen, whether they be 0x1 or 0x2
#
*mangle

# Set default policies for table
:PREROUTING ACCEPT [0:0]
:INPUT ACCEPT [0:0]
:FORWARD ACCEPT [0:0]
:OUTPUT ACCEPT [0:0]
:POSTROUTING ACCEPT [0:0]

# Restore CONNMARK to the MARK (If one doesn't exist then no mark is set)
-A PREROUTING -j CONNMARK --restore-mark --nfmask 0xffffffff --ctmask 0xffffffff

# If packet MARK is 2, then it means there is already a connection mark and the
# original packet came in on VPN
-A PREROUTING -s 192.168.2.0/24 -m mark --mark 0x2 -j ACCEPT

# Check exception (this is a server which when accessed on a 192.168.2.0/24 address will go out the ISP table) are 0x1
#-A PREROUTING -s 192.168.2.0/24 -d <IP_OF_EXCEPTED_SERVER>/32 -m mark --mark 0x1 -j ACCEPT

# Mark packets coming from 192.168.2.0/24 are 0x2
-A PREROUTING -s 192.168.2.0/24 -j MARK --set-xmark 0x2/0xffffffff

# If packet MARK is 1, then it means there is already a connection mark and the
# original packet came in on ISP
-A PREROUTING -s 192.168.1.0/24 -m mark --mark 0x1 -j ACCEPT

# Mark packets 192.168.1.0/24 are 0x1
-A PREROUTING -s 192.168.1.0/24 -j MARK --set-xmark 0x1/0xffffffff

# Mark exception (this is a server which when accessed on a 192.168.2.0/24 address will go out the ISP table) as 0x1
#-A PREROUTING -s 192.168.2.0/24 -d <IP_OF_EXCEPTED_SERVER>/32 -j MARK --set-xmark 0x1/0xffffffff

# Set mark to 0 - This is for the modem. Otherwise it will mark with 0x1 or 0x2
-A PREROUTING -d 192.168.0.1/32 -j MARK --set-xmark 0x0/0xffffffff

# Save MARK to CONNMARK (remember iproute can't see CONNMARKs)
-A PREROUTING -j CONNMARK --save-mark --nfmask 0xffffffff --ctmask 0xffffffff
COMMIT
您可能需要删除此处某些不适用于您的规则,例如 FreeRadius 规则。这将在本文后面介绍。
OpenVPN 路由
通常,当您连接到 OpenVPN 时,远程 VPN 服务器会将路由推送给您的系统。我们不希望这样做,因为我们仍然希望能够在不使用 VPN 的情况下访问互联网。我们还在本指南前面创建了我们想要使用的自己的路由。
您需要将其添加到您的 OpenVPN 配置文件底部
# Prevents default gateway from being set on the default routing table
route-noexec

# Allows route-up script to be executed
script-security 2

# Calls custom shell script after connection to add necessary routes
route-up /etc/openvpn/route-up-fwmark.sh
route-pre-down /etc/openvpn/route-pre-down-fwmark.sh
我的 VPN 在 /etc/openvpn 中这样排列
该服务器的 OpenVPN 配置文件
countrycode.serverNumber.openvpn.conf
该服务器的 OpenVPN 证书
countrycode.serverNumber.openvpn/countrycode.serverNumber.openvpn.crt
countrycode.serverNumber.openvpn/countrycode.serverNumber.openvpn.key
countrycode.serverNumber.openvpn/myKey.crt
countrycode.serverNumber.openvpn/myKey.key
所以我使用这个有用的脚本来自动化在服务器之间切换的过程
#!/bin/sh

vpn_server_filename=$1

rm /etc/openvpn/openvpn.conf
ln -s $vpn_server_filename /etc/openvpn/openvpn.conf
chown -R openvpn:openvpn /etc/openvpn
chmod -R a=-rwx,u=+rX /etc/openvpn
chmod u=x /etc/openvpn/*.sh*

if grep -Fxq "#CustomStuffHere" openvpn.conf
then
    echo "Not adding custom routes, this server has been used previously"
else
    echo "Adding custom route rules"
cat <<EOF >> /etc/openvpn/openvpn.conf

#CustomStuffHere
# Prevents default gateway from being set on the default routing table
route-noexec

# Allows route-up script to be executed
script-security 2

# Calls custom shell script after connection to add necessary routes
route-up /etc/openvpn/route-up-fwmark.sh
route-pre-down /etc/openvpn/route-pre-down-fwmark.sh

# Logging of OpenVPN to file
#log /etc/openvpn/openvpn.log
EOF

fi
echo "Remember to set BitTorrent port forward in VPN control panel"
这样,我只需运行以下命令即可在服务器之间切换
changevpn.sh countrycode.serverNumber.openvpn
然后重新启动 openvpn。我还被提醒在 VPN 控制面板上设置端口转发,以便我的 BitTorrent 客户端可以连接
service openvpn restart
最后,将 openvpn 添加到默认运行级别
rc-update add openvpn default
创建仅限 LAN 的子网
在本节中,我们将创建一个仅限 LAN 的子网。此子网将是 192.168.3.0/24。此子网的想法是其中的节点的数据包无法转发到 Internet,但是可以通过其他 LAN 子网 192.168.1.0/24 和 192.168.2.0/24 访问它们。此方法不使用 VLAN,尽管如果您有托管交换机,则建议使用 VLAN。此子网的想法是用于诸如 WiFi 接入点、联系本地 Asterisk 服务器的 IP 电话以及当然还有打印机之类的设备。
在本节末尾,我们将拥有类似这样的内容

/etc/iproute2/rt_tables
首先,我们将添加第三个路由表
3 LAN
/etc/network/interfaces
添加一个额外的虚拟接口(实际上只是 eth0 的 IP 地址)。
# LAN Only
auto eth0:3
iface eth0:3 inet static
  address 192.168.3.1
  netmask 255.255.255.0
  broadcast 192.168.3.255
  post-up /etc/network/route_LAN
/etc/network/route_LAN
此文件将添加我们的路由
#!/bin/sh

# Add routes from ISP to LAN
/sbin/ip route add 192.168.1.0/24 dev eth0 table LAN

# Add route from VPN to LAN
/sbin/ip route add 192.168.2.0/24 dev eth0 table LAN

# Add route from LAN to it's own table
/sbin/ip route add 192.168.3.0/24 dev eth0 table LAN
/etc/ppp/ip-up
将从 LAN 子网到 ISP 表的路由附加到
# Add route to LAN subnet
/sbin/ip route add 192.168.3.0/24 dev eth0 table ISP
/etc/openvpn/route-up-fwmark.sh
将从 LAN 子网到 VPN 表的路由附加到
# Add route to LAN only subnet
/sbin/ip route add 192.168.3.0/24 dev eth0 table VPN
/etc/ntpd.conf
为 ntp (OpenNTPD) 添加侦听地址。
您现在应该拥有
# Addresses to listen on (ntpd does not listen by default)
listen on 192.168.1.1
listen on 192.168.2.1
listen on 192.168.3.1
需要正确时间的设备将需要使用此 NTP 服务器,因为它们无法从 Internet 获取时间。
阻止非法地址
我们的 LAN 现在总共有 4 个可能的子网
- 192.168.0.0/30(调制解调器和路由器之间的连接)
- 192.168.1.0/24(ISP 表,直接路由出 WAN)
- 192.168.2.0/24(VPN 表,路由出 VPN)
- 192.168.3.0/24(仅限 LAN 主机的空路由子网)
- 172.16.32.0/20(VPN 提供商的网络,因此我们可以访问 VPN 网络上的内容)。
其他所有内容都应被拒绝。永远不应在 192.168.5.2 或 10.0.0.5 等地址上转发数据包。
安装 ipset
安装 ipset
apk add ipset
将其添加到启动项
rc-update add ipset default
现在我们需要将地址列表加载到 ipset 中 使用 IPset 和动态阻止列表保护您的服务器 提到了一个 脚本,该脚本特别有用。如果您想定期更新它,并且对于完整的非法地址列表,您应该运行此脚本作为 cron 作业,因为当分配该地址空间时,它们会发生变化。
就此而言,我们将仅使用 bogon-bn-nonagg.txt 列表。
0.0.0.0/8
10.0.0.0/8
100.64.0.0/10
127.0.0.0/8
169.254.0.0/16
172.16.0.0/12
192.0.0.0/24
192.0.2.0/24
192.168.0.0/16
198.18.0.0/15
198.51.100.0/24
203.0.113.0/24
224.0.0.0/4
240.0.0.0/4
这不太可能改变,因为它是 IPV4 保留 IP 地址 空间。脚本
#! /bin/bash

# /usr/local/sbin/fullbogons-ipv4
# BoneKracker
# Rev. 11 October 2012
# Tested with ipset 6.13

# Purpose: Periodically update an ipset used in a running firewall to block
# bogons. Bogons are addresses that nobody should be using on the public
# Internet because they are either private, not to be assigned, or have
# not yet been assigned.
#
# Notes: Call this from crontab. Feed updated every 4 hours.

# target="https://www.team-cymru.org/Services/Bogons/fullbogons-ipv4.txt"
# Use alternative URL from pfSense, due to 404 error with URL above
target="https://files.pfsense.org/lists/bogon-bn-nonagg.txt"
ipset_params="hash:net"

filename=$(basename ${target})
firewall_ipset=${filename%.*}           # ipset will be filename minus ext
data_dir="/var/tmp/${firewall_ipset}"   # data directory will be same
data_file="${data_dir}/${filename}"

# if data directory does not exist, create it
mkdir -pm 0750 ${data_dir}

# function to get modification time of the file in log-friendly format
get_timestamp() {
    date -r $1 +%m/%d' '%R
}

# file modification time on server is preserved during wget download
[ -w ${data_file} ] && old_timestamp=$(get_timestamp ${data_file})

# fetch file only if newer than the version we already have
wget -qNP ${data_dir} ${target}

if [ "$?" -ne "0" ]; then
    logger -p cron.err "IPSet: ${firewall_ipset} wget failed."
    exit 1
fi

timestamp=$(get_timestamp ${data_file})

# compare timestamps because wget returns success even if no newer file
if [ "${timestamp}" != "${old_timestamp}" ]; then

    temp_ipset="${firewall_ipset}_temp"
    ipset create ${temp_ipset} ${ipset_params}

    #sed -i '/^#/d' ${data_file}            # strip comments
    sed -ri '/^[#< \t]|^$/d' ${data_file}   # occasionally the file has been xhtml

    while read network; do
        ipset add ${temp_ipset} ${network}
    done < ${data_file}

    # if ipset does not exist, create it
    ipset create -exist ${firewall_ipset} ${ipset_params}

    # swap the temp ipset for the live one
    ipset swap ${temp_ipset} ${firewall_ipset}
    ipset destroy ${temp_ipset}

    # log the file modification time for use in minimizing lag in cron schedule
    logger -p cron.notice "IPSet: ${firewall_ipset} updated (as of: ${timestamp})."

fi
现在您应该在执行以下操作时看到列表已加载到内存中
ipset list
我们想要保存它,以便我们的路由器可以在下次启动时引用它。为此
rc-service ipset save
添加允许的网络
IPv4
ipset create allowed-nets-ipv4 hash:net,iface family inet
然后您可以添加每个允许的网络
ipset add allowed-nets-ipv4 192.168.0.0/30,eth1
ipset add allowed-nets-ipv4 192.168.1.0/24,eth0
ipset add allowed-nets-ipv4 192.168.2.0/24,eth0
ipset add allowed-nets-ipv4 192.168.3.0/24,eth0
ipset add allowed-nets-ipv4 127.0.0.0/8,lo
ipset add allowed-nets-ipv4 172.16.32.0/20,tun0
IPv6
对于 IPv6,如果您有任何 唯一本地地址 范围,您可以选择添加它们
ipset create allowed-nets-ipv6 hash:net,iface family inet6
ipset add allowed-nets-ipv6 fde4:8dba:82e1::/48,tun0
ipset add allowed-nets-ipv6 fde4:8dba:82e1:ffff::/64,eth0
最后,使用此命令保存集合,以便可以在下次启动时加载它们
rc-service ipset save
使用 iptables 限制 LAN 子网并阻止非法地址
最后,我们可以应用我们的 iptables 规则,来过滤 192.168.3.0/24 网段,并确保像 192.168.5.0/24 这样的子网不会被我们的路由器转发或访问。 您需要检查这些规则,并删除不适用于您的规则。
如果您已将 WiFi AP 移动到 192.168.3.0/24 子网,请不要忘记更改您的 RADIUS 规则。 您还需要编辑 /etc/raddb/clients.conf 文件。
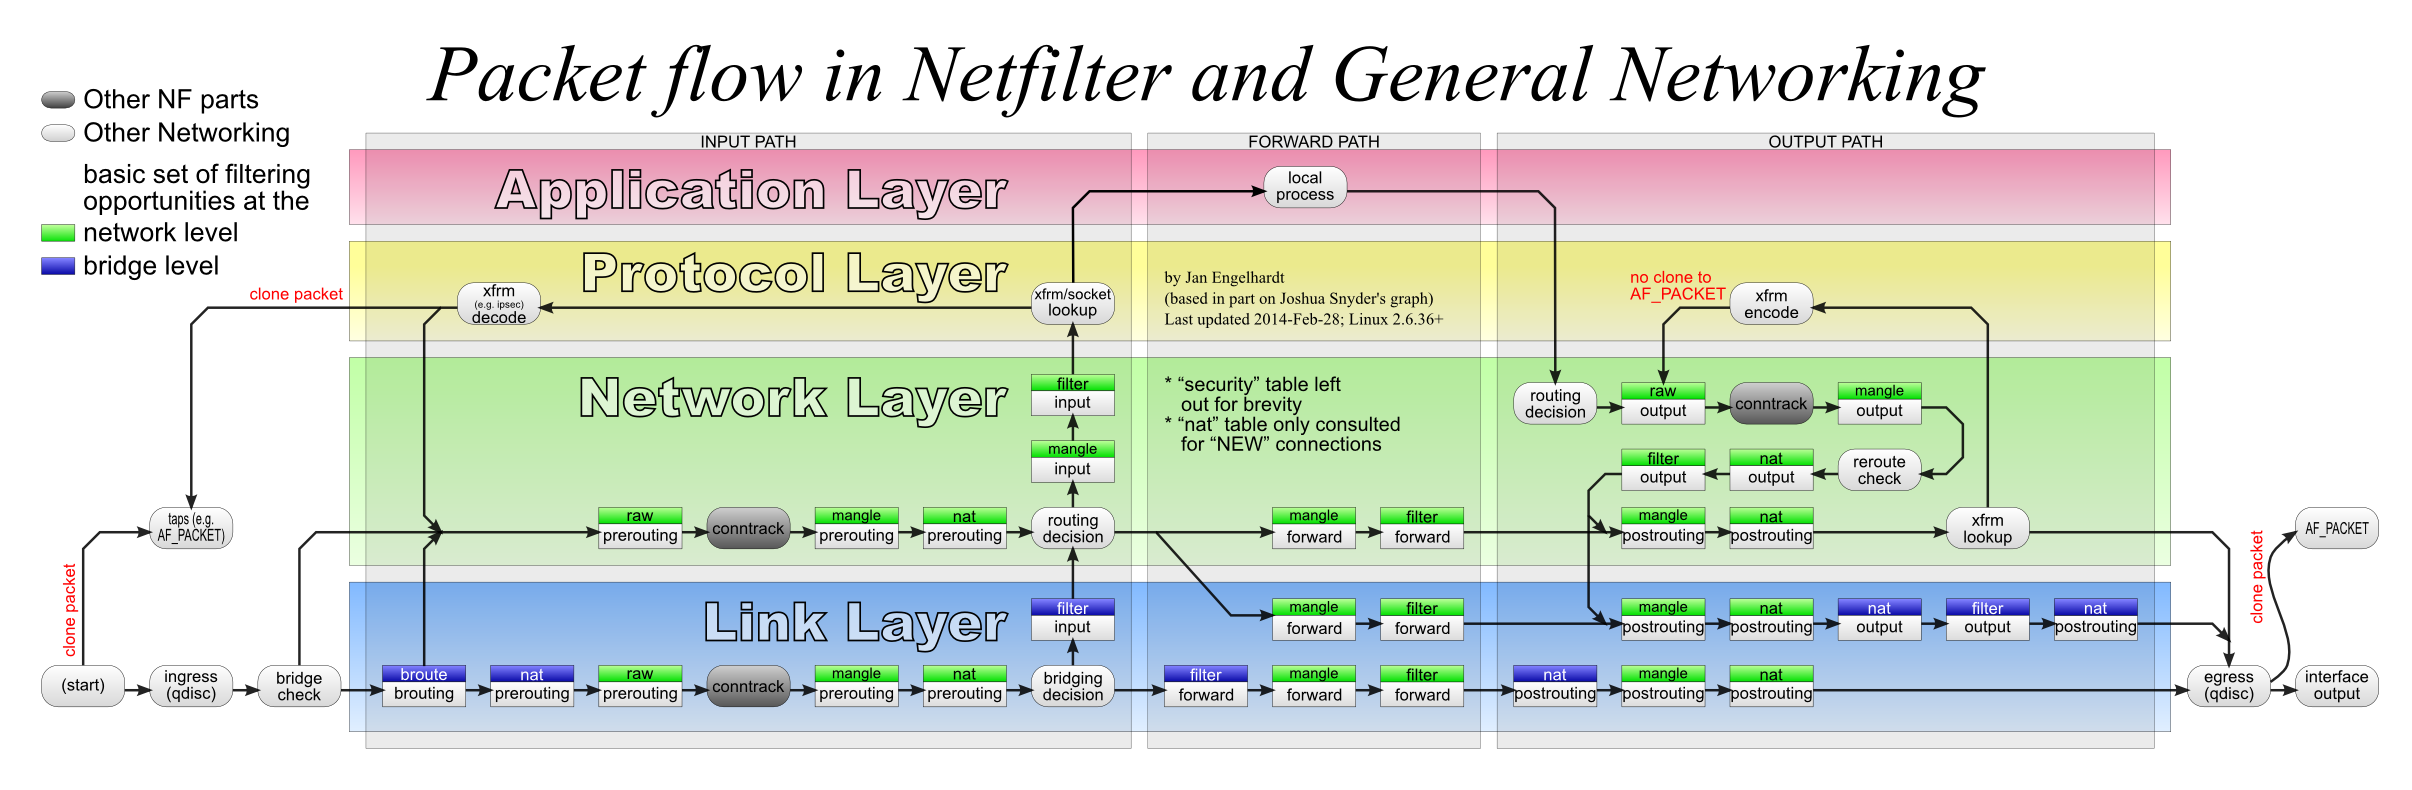
我在这里使用了一个名为 “raw” 的新表。 此表比 filter 表更底层。 它不能有 FORWARD 规则或 INPUT 规则。 因此,您仍然需要在您的 filter 表中设置一个 FORWARD 规则来阻止来自 LAN 的非法网络流量(bogons)。
我们在这里唯一可以使用的规则类型是 PREROUTING 和 OUTPUT。 OUTPUT 规则将仅过滤来自我们路由器本地进程的流量,例如,如果我们从路由器的命令提示符对非法网络流量范围执行 ping 命令。
流量在连接标记之前会经过 raw 表,如这个数据包流向图所示: Netfilter 数据包流向图 这意味着我们不再需要在 mangle 表中剥离非法网络流量范围的标记。
#########################################################################
# Advanced routing rule set
# Uses 192.168.1.0 via ISP
#      192.168.2.0 via VPN
#      192.168.3.0 via LAN
#
# Packets to/from 192.168.1.0/24 are marked with 0x1 and routed to ISP
# Packets to/from 192.168.2.0/24 are marked with 0x2 and routed to VPN
# Packets to/from 192.168.3.0/24 are routed to LAN and not forwarded onto
#                                    the internet
#
#########################################################################

#
# Raw Table
# This table is the place where we drop all illegal packets from networks that
# do not exist
#
*raw
:PREROUTING ACCEPT [0:0]
:OUTPUT ACCEPT [0:0]

# Create a log drop chain
:LOG_DROP_BOGON - [0:0]

# Create an output chain
:OUT_PPP0 - [0:0]
:OUT_TUN0 - [0:0]

# Allows traffic from VPN tunnel
-A PREROUTING -s 172.16.32.0/20 -i tun0 -j ACCEPT

# Allows traffic to VPN tunnel
-A PREROUTING -d 172.16.32.0/20 -j ACCEPT

# Block specified bogons coming in from ISP and VPN
# (unlikely to happen as they filter them on their router)
-A PREROUTING -i ppp0 -m set --match-set bogon-bn-nonagg src -j LOG_DROP_BOGON
-A PREROUTING -i tun0 -m set --match-set bogon-bn-nonagg src -j LOG_DROP_BOGON

# Allows my excepted ranges.
-A PREROUTING -m set --match-set allowed-nets-ipv4 src,src -j ACCEPT

# Pass output interface to corresponding chain
-A OUTPUT -o ppp0 -j OUT_PPP0
-A OUTPUT -o tun0 -j OUT_TUN0

# Log drop chain
-A LOG_DROP_BOGON -j LOG --log-prefix "Dropped Bogon (ipv4) : " --log-level 6
-A LOG_DROP_BOGON -j DROP

# Block packets originating from the router destined to bogon ranges
-A OUT_PPP0 -m set --match-set bogon-bn-nonagg dst -j LOG_DROP_BOGON

# Blocks packets originating from the router destined to bogon ranges
-A OUT_TUN0 -d 172.16.32.0/20 -j ACCEPT
-A OUT_TUN0 -m set --match-set bogon-bn-nonagg dst -j LOG_DROP_BOGON
COMMIT

#
# NAT Table
# This is where translation of packets happens as well as "forwarding" of ports
# to specific hosts.
#
*nat
:PREROUTING ACCEPT [0:0]
:INPUT ACCEPT [0:0]
:OUTPUT ACCEPT [0:0]
:POSTROUTING ACCEPT [0:0]

# Port forwarding for Bittorrent
-A PREROUTING -i tun0 -p tcp -m tcp --dport 6881:6889 -j DNAT --to-destination 192.168.2.20
-A PREROUTING -i tun0 -p udp -m udp --dport 6881:6889 -j DNAT --to-destination 192.168.2.20

# Allows routing to our modem subnet so we can access the web interface
-A POSTROUTING -s 192.168.1.0/24 -d 192.168.0.1/32 -o eth1 -p tcp -m tcp --dport 80 -j MASQUERADE
-A POSTROUTING -s 192.168.2.0/24 -d 192.168.0.1/32 -o eth1 -p tcp -m tcp --dport 80 -j MASQUERADE

# Allows hosts of the network to use the VPN tunnel
-A POSTROUTING -o tun0 -j MASQUERADE

# Allows hosts of the network to use the PPP tunnel
-A POSTROUTING -o ppp0 -j MASQUERADE
COMMIT

#
# Filter Table
# This is where we decide to ACCEPT, DROP or REJECT packets
#
*filter
:INPUT DROP [0:0]
:FORWARD DROP [0:0]
:OUTPUT ACCEPT [0:0]

# Create rule chain per input interface for forwarding packets
:FWD_ETH0 - [0:0]
:FWD_ETH1 - [0:0]
:FWD_PPP0 - [0:0]
:FWD_TUN0 - [0:0]

# Create rule chain per input interface for input packets (for host itself)
:IN_ETH0 - [0:0]
:IN_ETH1 - [0:0]
:IN_PPP0 - [0:0]
:IN_TUN0 - [0:0]

# Create a drop chain
:LOG_DROP - [0:0]

# Create a log drop chain
:LOG_DROP_BOGON - [0:0]

# Create a reject chain
:LOG_REJECT_LANONLY - [0:0]

# Create an output chain
:OUT_PPP0 - [0:0]
:OUT_TUN0 - [0:0]

# Pass input packet to corresponding rule chain
-A INPUT -i lo -j ACCEPT
-A INPUT -i eth0 -j IN_ETH0
-A INPUT -i eth1 -j IN_ETH1
-A INPUT -i ppp0 -j IN_PPP0
-A INPUT -i tun0 -j IN_TUN0

# Track forwarded packets
-A FORWARD -m conntrack --ctstate RELATED,ESTABLISHED -j ACCEPT

# Pass forwarded packet to corresponding rule chain
-A FORWARD -i eth0 -j FWD_ETH0
-A FORWARD -i eth1 -j FWD_ETH1
-A FORWARD -i ppp0 -j FWD_PPP0
-A FORWARD -i tun0 -j FWD_TUN0

# Pass output interface to corresponding chain
-A OUTPUT -o ppp0 -j OUT_PPP0
-A OUTPUT -o tun0 -j OUT_TUN0

# Forward traffic to Modem
-A FWD_ETH0 -d 192.168.0.1/32 -j ACCEPT

# Allow routing to remote address on VPN
-A FWD_ETH0 -s 192.168.1.0/24 -d 172.16.32.1/32 -o tun0 -j ACCEPT
-A FWD_ETH0 -s 192.168.2.0/24 -d 172.16.32.1/32 -o tun0 -j ACCEPT

# Allow forwarding from LAN hosts to LAN ONLY subnet
-A FWD_ETH0 -s 192.168.1.0/24 -d 192.168.3.0/24 -j ACCEPT
-A FWD_ETH0 -s 192.168.2.0/24 -d 192.168.3.0/24 -j ACCEPT

# Allow LAN ONLY subnet to contact other LAN hosts
-A FWD_ETH0 -s 192.168.3.0/24 -d 192.168.1.0/24 -j ACCEPT
-A FWD_ETH0 -s 192.168.3.0/24 -d 192.168.2.0/24 -j ACCEPT

# Refuse to forward bogons to the internet!
-A FWD_ETH0 -m set --match-set bogon-bn-nonagg dst -j LOG_DROP_BOGON

# Forward traffic to ISP
-A FWD_ETH0 -s 192.168.1.0/24 -j ACCEPT

# Forward traffic to VPN
-A FWD_ETH0 -s 192.168.2.0/24 -j ACCEPT

# Prevent 192.168.3.0/24 from accessing internet
-A FWD_ETH0 -s 192.168.3.0/24 -j LOG_REJECT_LANONLY

# Allow excepted server to be FORWARD to ppp0
#-A FWD_ETH0 -s 192.168.2.0/24 -d <IP_OF_EXCEPTED_SERVER>/32 -o ppp0 -j ACCEPT

# Forward SSH packets from network to modem
-A FWD_ETH1 -s 192.168.0.1/32 -d 192.168.1.0/24 -p tcp -m tcp --sport 22 -m conntrack --ctstate NEW,ESTABLISHED -j ACCEPT
-A FWD_ETH1 -s 192.168.0.1/32 -d 192.168.2.0/24 -p tcp -m tcp --sport 22 -m conntrack --ctstate NEW,ESTABLISHED -j ACCEPT

# Forward HTTP packets from network to mode
-A FWD_ETH1 -s 192.168.0.1/32 -d 192.168.1.0/24 -p tcp -m tcp --sport 80 -m conntrack --ctstate NEW,ESTABLISHED -j ACCEPT
-A FWD_ETH1 -s 192.168.0.1/32 -d 192.168.2.0/24 -p tcp -m tcp --sport 80 -m conntrack --ctstate NEW,ESTABLISHED -j ACCEPT

# Forward Bittorrent Port to workstation
-A FWD_TUN0 -d 192.168.2.20/32 -p tcp -m tcp --dport 6881:6889 -m conntrack --ctstate NEW,ESTABLISHED -j ACCEPT
-A FWD_TUN0 -d 192.168.2.20/32 -p udp -m udp --dport 6881:6889 -m conntrack --ctstate NEW,ESTABLISHED -j ACCEPT

# SSH to Router
-A IN_ETH0 -s 192.168.1.0/24 -p tcp -m tcp --dport 22 -m conntrack --ctstate NEW,ESTABLISHED -j ACCEPT
-A IN_ETH0 -s 192.168.2.0/24 -p tcp -m tcp --dport 22 -m conntrack --ctstate NEW,ESTABLISHED -j ACCEPT

# DNS to Router
-A IN_ETH0 -s 192.168.1.0/24 -p udp -m udp --dport 53 -m conntrack --ctstate NEW -j ACCEPT
-A IN_ETH0 -s 192.168.2.0/24 -p udp -m udp --dport 53 -m conntrack --ctstate NEW -j ACCEPT

# FreeRadius Client (eg a UniFi AP)
-A IN_ETH0 -s 192.168.3.10/32 -p tcp -m tcp --dport 1812 -m conntrack --ctstate NEW,ESTABLISHED -j ACCEPT
-A IN_ETH0 -s 192.168.3.10/32 -p udp -m udp --dport 1812 -m conntrack --ctstate NEW,ESTABLISHED -j ACCEPT

# Ubiquiti UAP Device Discovery Broadcast
-A IN_ETH0 -s 192.168.3.10/32 -p udp -m udp --dport 10001 -m conntrack --ctstate NEW,ESTABLISHED -j ACCEPT

# NTP to Router
-A IN_ETH0 -s 192.168.1.0/24 -p udp -m udp --dport 123 -m conntrack --ctstate NEW,ESTABLISHED -j ACCEPT
-A IN_ETH0 -s 192.168.2.0/24 -p udp -m udp --dport 123 -m conntrack --ctstate NEW,ESTABLISHED -j ACCEPT
-A IN_ETH0 -s 192.168.3.0/24 -p udp -m udp --dport 123 -m conntrack --ctstate NEW,ESTABLISHED -j ACCEPT

# Accept traffic to router on both subnets
-A IN_ETH0 -s 192.168.1.0/24 -m conntrack --ctstate NEW,ESTABLISHED -j ACCEPT
-A IN_ETH0 -s 192.168.2.0/24 -m conntrack --ctstate NEW,ESTABLISHED -j ACCEPT

# Allow excepted server to be INPUT to eth0 from LAN
#-A IN_ETH0 -s 192.168.2.0/24 -d <IP_OF_EXCEPTED_SERVER>/32 -o ppp0 -j ACCEPT

# SSH To Modem from Router
-A IN_ETH1 -s 192.168.0.1/32 -d 192.168.0.0/30 -p tcp -m tcp --sport 22 -m conntrack --ctstate NEW,ESTABLISHED -j ACCEPT

# HTTP To Modem from Router
-A IN_ETH1 -s 192.168.0.1/32 -d 192.168.0.0/30 -p tcp -m tcp --sport 80 -m conntrack --ctstate NEW,ESTABLISHED -j ACCEPT

# Accept incoming tracked PPP0 connection
-A IN_PPP0 -m conntrack --ctstate RELATED,ESTABLISHED -j ACCEPT

# Log dropped packets coming in on PPP0
-A IN_PPP0 -j LOG --log-prefix "DROP:INPUT (ipv4) " --log-level 6
-A IN_PPP0 -j LOG_DROP

# Accept incoming tracked TUN0 connection
-A IN_TUN0 -m conntrack --ctstate RELATED,ESTABLISHED -j ACCEPT

# Log dropped packets coming in on TUN0
-A IN_TUN0 -j LOG --log-prefix "DROP:INPUT (ipv4) " --log-level 6
-A IN_TUN0 -j LOG_DROP

# Log dropped bogons that never got forwarded
-A LOG_DROP_BOGON -j LOG --log-prefix "Dropped Bogon forward (ipv4) " --log-level 6
-A LOG_DROP_BOGON -j DROP

# Log rejected packets
-A LOG_REJECT_LANONLY -j LOG --log-prefix "Rejected packet from LAN only range : " --log-level 6
-A LOG_REJECT_LANONLY -j REJECT --reject-with icmp-port-unreachable
COMMIT

#
# Mangle Table
# This is the place where our markings happen, whether they be 0x1 or 0x2
#
*mangle

# Set default policies for table
:PREROUTING ACCEPT [0:0]
:INPUT ACCEPT [0:0]
:FORWARD ACCEPT [0:0]
:OUTPUT ACCEPT [0:0]
:POSTROUTING ACCEPT [0:0]

# Restore CONNMARK to the MARK (If one doesn't exist then no mark is set)
-A PREROUTING -j CONNMARK --restore-mark --nfmask 0xffffffff --ctmask 0xffffffff

# If packet MARK is 2, then it means there is already a connection mark and the
# original packet came in on VPN
-A PREROUTING -s 192.168.2.0/24 -m mark --mark 0x2 -j ACCEPT

# Check exception (this is a server which when accessed on a 192.168.2.0/24 address will go out the ISP table) are 0x1
#-A PREROUTING -s 192.168.2.0/24 -d <IP_OF_EXCEPTED_SERVER>/32 -m mark --mark 0x1 -j ACCEPT

# Mark packets coming from 192.168.2.0/24 are 0x2
-A PREROUTING -s 192.168.2.0/24 -j MARK --set-xmark 0x2/0xffffffff

# If packet MARK is 1, then it means there is already a connection mark and the
# original packet came in on ISP
-A PREROUTING -s 192.168.1.0/24 -m mark --mark 0x1 -j ACCEPT

# Mark packets 192.168.1.0/24 are 0x1
-A PREROUTING -s 192.168.1.0/24 -j MARK --set-xmark 0x1/0xffffffff

# Mark exception (this is a server which when accessed on a 192.168.2.0/24 address will go out the ISP table) as 0x1
#-A PREROUTING -s 192.168.2.0/24 -d <IP_OF_EXCEPTED_SERVER>/32 -j MARK --set-xmark 0x1/0xffffff

# Strip mark if packet is destined for modem
-A PREROUTING -d 192.168.0.1/32 -j MARK --set-xmark 0x0/0xffffffff

# Save MARK to CONNMARK (remember iproute can't see CONNMARKs)
-A PREROUTING -j CONNMARK --save-mark --nfmask 0xffffffff --ctmask 0xffffffff
COMMIT
其他提示
诊断防火墙问题
netcat, netcat6
Netcat 可用于测试端口是打开、关闭还是被过滤。
apk add netcat-openbsd
安装 netcat 后,我们可以像这样使用它
假设我们想要测试 IPv6、UDP、端口 547,我们将在路由器上执行以下操作
nc -6 -u -l 547
然后在客户端上执行以下操作以连接到它
nc -u -v -6 2001:0db8:1234:0001::1 547
tcpdump
tcpdump 也可用于转储接口上接收的数据包内容
apk add tcpdump
然后我们可以运行它。 此示例捕获所有来自 192.168.2.20 的 DNS 流量。
tcpdump -i eth0 udp and src 192.168.2.20 and port 53
您可以使用 -w 选项将文件输出,并在您本地计算机上的 Wireshark 中查看它。 您可以使用 -v 选项增加详细程度。 使用 -vv 将会更加详细。 -vvv 将显示更多信息。
lbu cache
配置 lbu cache,以便在重启路由器时不需要下载软件包,例如 本地 APK 缓存
这一点尤其重要,因为某些镜像不包含 ppp-pppoe。 这可能意味着您在启动时无法获得互联网连接来下载其他软件包。
lbu encryption /etc/lbu/lbu.conf
在 /etc/lbu/lbu.conf 中,您可能需要启用加密来保护您的 VPN 密钥。
# what cipher to use with -e option
DEFAULT_CIPHER=aes-256-cbc

# Uncomment the row below to encrypt config by default
ENCRYPTION=$DEFAULT_CIPHER

# Uncomment below to avoid <media> option to 'lbu commit'
# Can also be set to 'floppy'
LBU_MEDIA=mmcblk0p1

# Set the LBU_BACKUPDIR variable in case you prefer to save the apkovls
# in a normal directory instead of mounting an external medium.
# LBU_BACKUPDIR=/root/config-backups

# Uncomment below to let lbu make up to 3 backups
# BACKUP_LIMIT=3
请记住设置 root 密码,默认情况下 Alpine Linux 的 root 帐户是无密码的。
passwd root
备份 apkprov
备份您的 apk provision 文件是个好主意。 您可以使用以下命令将其从路由器拉取到您的本地工作站
scp -r root@192.168.2.1:/media/mmcblk0p1/<YOUR HOST NAME>.apkovl.tar.gz.aes-256-cbc ./
并使用以下命令解密它
openssl enc -d -aes-256-cbc -in <YOUR HOST NAME>.apkovl.tar.gz.aes-256-cbc -out <YOUR HOST NAME>.apkovl.tar.gz
可以使用以下命令加密它
openssl aes-256-cbc -salt -in <YOUR HOST NAME>.apkovl.tar.gz -out <YOUR HOST NAME>.apkovl.tar.gz.aes-256-cbc
加固 SSH
生成 SSH 密钥
ssh-keygen -t rsa -b 4096
您需要将 id_rsa.pub 的内容放入 /etc/ssh/authorized_keys 中
如果有多人可以访问路由器,您可以将多个公钥放在多行上。
/etc/ssh/sshd_config
以下是一些可以在此处设置的不错选项
ListenAddress 192.168.1.1
ListenAddress 192.168.2.1
虽然这通常不是一个好主意,但路由器不需要超过一个用户。
PermitRootLogin yes
最重要的选项
RSAAuthentication yes
PubkeyAuthentication yes
AuthorizedKeysFile  /etc/ssh/authorized_keys
PasswordAuthentication no
PermitEmptyPasswords no
AllowTcpForwarding no
X11Forwarding no
/etc/conf.d/sshd
您需要添加
rc_need="net"
这指示 OpenRC 确保在启动 SSH 之前网络已启动。
最后将 sshd 添加到默认运行级别
rc-update add sshd default
此外,您可能需要查看 Secure Secure Shell 并加强 OpenSSH 的加密选项。